I haven’t provided an update on the KHouse Modern in a long while so this post is quite overdue. This house is really amazing and the craft in which it is being built is incredible … and sometimes incredible craftsmanship takes a little longer than you might want it to take. The last several months have been spent running electrical and plumbing lines, putting the roof on, installing the many, many windows, and starting the installation of the exterior cladding. I’m sure there are some hardcore technically minded folks out there that would probably enjoy a post on installing a 80mil PVC roof, I don’t find them particularly interesting to write about (there’s only so many “I almost fell off the roof” OSHA types jokes a person can make).
While this isn’t the most exciting post title I’ve ever come up with, this is nonetheless a very awesome post because it covers an area of the interior finish work that can make or break a modern house and it something that most people don’t give two thoughts about. If I were to take roll call and ask you if you know the difference between a level 4 and a level 5 drywall finish, how many of you would know the answer? Don’t lie. Okay, so let’s say you do know the difference, how many people know how that finish level is achieved in the field?
But before we get to all that, let’s do a quick recap (If you need to play catch up on all the KHouse Modern posts, you can find them here)
.
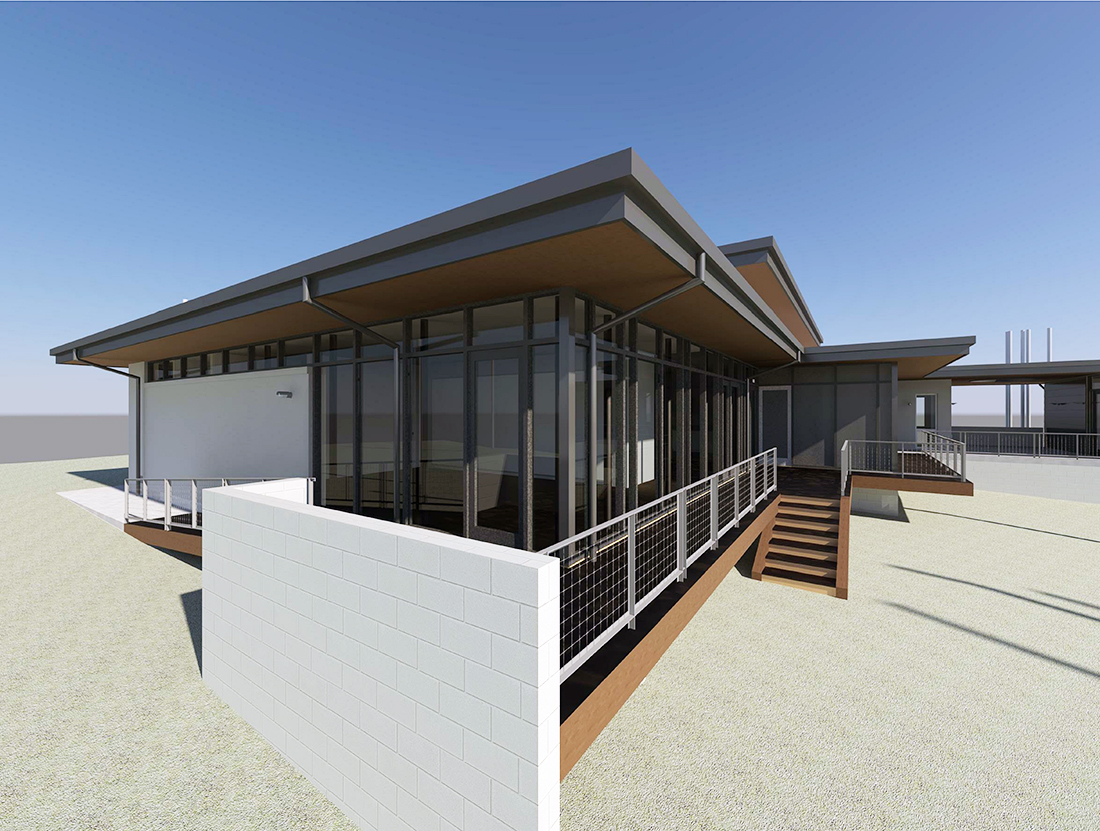
The image above was taken from a post I wrote back in February 2014 and shows the exterior corner of the Master Bedroom wing. A lot of things have happened in the last year but if you’ll look at the photo I took of this same corner last week …
… it looks pretty similar to the imagined design. Two notable changes – we changed the bronze anodized windows to clear anodized aluminum, and we changed some of the burnished block walls in the landscape to cast-in-place concrete. It’s another layer of texture that we were looking for – I think it contrasts nicely with the naturally sealed tongue and groove Douglas Fir soffit.

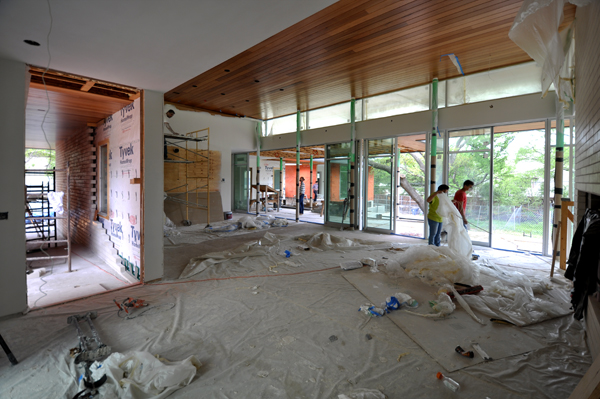
This is in the main living space of the house – the light quality in this room is amazing. At this point in the photo, the drywall crew is starting the mudding process – covering up joints where sheets of drywall meet one-another, masking the divets where drywall screws are set. Other than the rift cut 6″ wide white oak flooring, the finishes in this room are pretty similar to what you see here. Cream colored burnished bricks, naturally finished Douglas Fir ceiling, white-painted walls, and blackened steel fireplace enclosure at the far end of the room.

Since a part of this post is to describe the finish level of drywall and why a level 5 finish is important in a space like this, it is important to see all these “during” pictures. Level 5 walls don’t just happen, they get built up over time. Essentially you are looking at a Level 4 finish (which I explain in more detail below). When you have large windows that literally rake a wall like this (the taller, the more important to have a highly finished wall) the light will expose every flaw, warp, bend, waffle, etc. whatever you want to call it. To show you the difference, take a look at the window above and then compare it to the next one, taken just a few days later after the Level 5 process has been complete.

The walls look like they’ve been painted, don’t they? Actually, the entire wall has been coated in drywall mud, allowed to thoroughly dry, and is now being sanded down to be perfectly smooth and level. See that guy standing up there on the scaffolding? He has been hand sanding that wall for DAYS!! (well, maybe not days, but for a long time). That brown stuff you see up there is butcher paper that was taped into place to protect the DougFir ceiling from getting sanded.
Also, if you are wondering why the wall has plywood on it, that because this house will have a Bulthaup kitchen in it and that a requirement of that kitchen system … but more on that later.

Here is another look into the same space in a before and after. I also included this picture to show that we have 16′ wide opening in our glass wall. The space I am standing in is the exterior screened dining room and we are looking into the kitchen and dining areas.

Fast forward a few days and you can see the entire kitchen/dining and living room has been mudded to a level 5 finish and is being sanded. I have also brought with me my wide-angled lens so that would explain why you can see more of the exterior screened in dining room. The two boxed out troughs you see in the ceiling will be for recessed in-line heaters.
Nice.

One final look into the main living area – who wouldn’t want a room like this in their house?!?
I have spoken a lot about the “oculus” that’s in this house (read “Is that an Oculus?” to get caught up). The image above is the design rendering we prepared when I was pitching the idea of cutting a round hole into the ceiling of our exterior grilling porch.

This have progressed pretty nicely on the oculus and I am happy to say that it functions exactly as predicted and looks just as good as hoped.

This exterior grilling area looks out into the back yard and frames a beautiful live oak tree (that is a piece of art in and of itself).

Closeup look at the 20 gauge G-90 metal that we used for all the roof flashing and metal siding. 20 gauge is thick enough to avoid the “oil canning” (when the metal starts getting wavy) that you would see if we went to a lighter gauge (like a 22 or even a 24 gauge metal).

More of the poured in place concrete that replace what was previously burnished concrete block. The orange that you see is the building wrap that we use behind metal siding, so anytime you see this orange in my photos, it will eventually be horizontally oriented G-90 metal siding.
So, let’s get into the finishing of a wall –

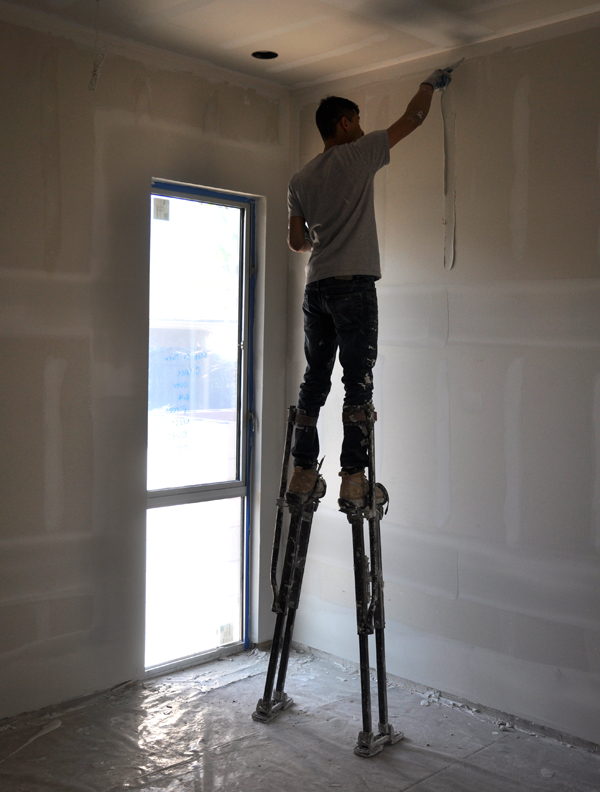
Here is a level 5 finish in the master bedroom area of the house – you can see with all the natural light coming into this room how important the drywall finish would be. The entire wall gets built up slowly in drywall mud and then the entire wall gets sanded down.

I have to admit, the idea of walking around on stilts all day sounds awesome but, something happened to me when I turned 40 and I can’t seem to walk in these things anymore. I remember when I was a child, the family who lived behind us was redoing their house and the drywall guy let me and the owner’s kid try walking around in his stilts. In about 10 seconds, we were both masters – running around the yard and jumping over stuff. I actually remember having a competition to see who could jump over this hedge made up of Nellie R. Stevens Holly bushes (we simply called them “sticker” bushes when I was a kid, now that I’m grown, I know what they are really called). This hedge was about 3′ tall and both of us had no difficulties at all clearing it. There may, or may not, have been wagering among the construction workers as to who would win. At any rate, now if I just look at these stilts for too long, I fall over.

Here is the same room that the guy wearing the stilts was working in – corner windows? Level 5 finish, please.

So here it is – the secret to a level 5 finish. They roll the drywall mud in to place after they achieve a level 4 finish!
All six levels of wall finish are listed and defined here but in my projects, we rarely go below a level 4 finish. Depending on the sheen of the paint on the wall – or if the wall is in a space that receives an abundance of natural light raking across the wall, you might really need a level 5 finish (defined below). Otherwise, you will see every tape joint and wall imperfection like it’s circled in blood from the person who painted your wall. So here you go – keep in mind the quality of the wall surface before deciding on which paint sheen you wish to use. Once you get to level 4, I included the recommendations from most paint manufacturers which sheen should go with what wall finish level.
Level 0
Level 0 is used in temporary construction or if final decoration is undetermined. No taping or finishing is required. Dust walls constructed in mall storefronts are an example of walls finished at level 0.
Level 1
A Level 1 finish is recommended in areas that would generally be concealed from view or in areas that are not open to public traffic. In Level 1, the surface is left free of excess joint compound. Ridges and tool marks are acceptable for a Level 1 finish. This level is often specified in the plenum area above ceilings, in attics, or in service corridors.
Level 2
In garages, warehouse storage areas and other similar areas where the final surface appearance is not of concern, a Level 2 finish is the recommendation. Level 2 may be specified where moisture resistant gypsum board is used as a tile substrate. Joint compound is applied over all fastener heads and beads. The surface is left free of excess joint compound. Ridges and tool marks are acceptable for a Level 2 finish.
Level 3
In areas to be decorated with a medium or heavy texture or where heavy-grade wall coverings will become the final decoration, a Level 3 finish is recommended. Fastener heads and accessories shall be covered with two separate coats of joint compound and all joint compound shall be smooth and free from tool marks and ridges. Before final decoration, it is recommended that the prepared surface be coated with a drywall primer prior to the application of final finishes. Level 3 is not recommended where smooth painted surfaces or light to medium-weight wall coverings become the final decoration.
Level 4
If the final decoration is to be a flat paint, light texture or lightweight wall covering, a Level 4 finish is recommended. Fastener heads and accessories shall be covered with three separate coats of joint compound. All joint compound shall be smooth and free from tool marks and ridges. Before final decoration it is recommended that the prepared surface be coated with a drywall primer prior to the application of final finishes. Gloss, semi-gloss and enamel paints are not recommended over a Level 4 finish.
.
Level 5
Level 5 finish is recommended for areas where severe lighting conditions exist and areas that are to receive gloss, semi-gloss, enamel or non-textured flat paints. Level 5 requires all the operations in Level 4. Additionally, a thin skim coat of joint compound, or material manufactured especially for this purpose, is applied to the entire surface. The surface is smooth and free from tool marks and ridges. Before final decoration it’s recommended that the prepared surface be coated with a primer prior to the application of final finishes. The Level 5 finish is required to achieve the highest degree of quality by providing a uniform surface and minimizing the possibility of joint photographing and/or fasteners “burning through” the final decoration.
Modern residential projects should almost always call for a level 5 finish – especially true if there is a lot of natural light coming in to the space.
I hope you liked the update, maybe learned a thing or two (not including my ability to walk in stilts) along the way.
Happy drywall mudding,


